
Colimación maksutov Maxvision idéntico al Bresser 152/1900
-
lunaluser

- Articles: 0
- Posts: 8
- Joined: Sat Apr 08, 2023 12:02 am
- 1
- Location: Lujan de cuyo - mendoza - argentina
- Status:
Offline
Colimación maksutov Maxvision idéntico al Bresser 152/1900
Hola, buenas tardes. respecto a mi telescopio Maxvision idéntico al Bresser 152/1900 Maksutov, sigo sin poder colimarlo bien. Algún miembro de este foro tiene uno para que me puedan aconsejar. mientras tanto lo estoy colimando a través de un Cheshire y una tapa de ocular con un orificio de 1 mm, quería hacerlo a través de una estrella artificial pero se necesita una distancias de 50 metros para que el enfoque sea efectivo, así que sigo. con el cheshire y la tapa de colimación, pero a pesar de que los discos quedan centrados, siento que las imágenes que da carecen de definición... ¿Alguna recomendación que me puedas decir u otro método que me puedas recomendar? Gracias y saludos desde Mendoza Argentina
-
Lady Fraktor


- Articles: 0
- Posts: 10074
- Joined: Mon Apr 29, 2019 9:14 pm
- 5
- Location: Slovakia
- Status:
Offline
Re: Colimación maksutov Maxvision idéntico al Bresser 152/1900
Hello and welcome.
Translated message: Hello, good afternoon. Regarding my Maxvision telescope identical to the Bresser 152/1900 Maksutov, I still can't collimate it well. Some member of this forum has one so they can advise me. Meanwhile I am collimating it through a Cheshire and an eyepiece cap with a 1mm hole, I wanted to do it through an artificial star but it takes a distance of 50 meters for the focus to be effective, so I continue. with the cheshire and the collimation cap, but despite the fact that the discs are centered, I feel that the images it gives lack definition... Any recommendation that you can give me or another method that you can recommend? Thanks and greetings from Mendoza Argentina
As far as I understand Maksutov and Cassagrien telescopes cannot be properly collimated with a standard cheshire or collimation cap like a newtonian.
You will need to use the artificial star or a actual star test to get proper collimation.
Baader Planetarium makes the only laser I know of that can be used with these telescopes and Takahashi makes the collimating telescope.
Hopefully someone with this telescope can advise you more.
https://www.baader-planetarium.com/en/a ... k-iii.html
https://www.firstlightoptics.com/takaha ... 00443.html
Some nice refractors, eyepieces, mounts and related equipment
The only culture I have is from yogurt

The only culture I have is from yogurt
-
lunaluser
- Articles: 0
- Posts: 8
- Joined: Sat Apr 08, 2023 12:02 am
- 1
- Location: Lujan de cuyo - mendoza - argentina
- Status:
Offline
Re: Colimación maksutov Maxvision idéntico al Bresser 152/1900
Muchas Gracias Lady Fraktor. Si tengo entendido que es así como Usted dice... pero tanto Bresser como otros fabricantes que usan el espejo primario fijo en estos diseños, también en sus indicaciones de manual aconsejan colimarlos también mirando a través colimador tipo tapa sobre un fondo blanco iluminado, pero Usted dice bien .. voy a tratar de colimarlo con una estrella artificial. Gracias
-
Lady Fraktor
- Articles: 0
- Posts: 10074
- Joined: Mon Apr 29, 2019 9:14 pm
- 5
- Location: Slovakia
- Status:
Offline
Re: Colimación maksutov Maxvision idéntico al Bresser 152/1900
You can get the mirrors aligned fairly well with the cheshire/ cap but you will not get it more than close.
You will need to do a star test outside or use the artificial star to get them aligned fully.
Good luck
Puede alinear los espejos bastante bien con el cheshire/cap pero no lo conseguirá más que cerca.
Deberá hacer una prueba de estrella afuera o usar la estrella artificial para alinearlos completamente.
Buena suerte
Some nice refractors, eyepieces, mounts and related equipment
The only culture I have is from yogurt
The only culture I have is from yogurt
-
lunaluser
- Articles: 0
- Posts: 8
- Joined: Sat Apr 08, 2023 12:02 am
- 1
- Location: Lujan de cuyo - mendoza - argentina
- Status:
Offline
 Re: Colimación maksutov Maxvision idéntico al Bresser 152/1900
Buenas noches Lady Fraktor si.... este fin de semana colimare con una estrella. Gracias 
-
lunaluser
- Articles: 0
- Posts: 8
- Joined: Sat Apr 08, 2023 12:02 am
- 1
- Location: Lujan de cuyo - mendoza - argentina
- Status:
Offline
Re: Colimación maksutov Maxvision idéntico al Bresser 152/1900
Hola de nuevo, al final resolví el asunto a través de la práctica y guiándome por tus comentarios.
Cada par de tornillos funciona de forma independiente, ya sea colimado con una estrella real, con una tapa de colimación o con un cheshire.
Primero se identifica hacia que lado está el mayor desplazamiento de la sombra o anillos concéntricos y se afloja el tornillo pequeño de ese lado quees solo de traba y trabaja colimando con el grande, se ve por donde se mueve la sombra y según a esto, continuar con los demás tornillos si es necesario, habiendo ajustado previamente el tornillo de bloqueo que aflojamos.
Cuando ajustamos el tornillo grande, la celda primaria se acerca a la parte trasera de laota y viceversa y así colimamos este tipo de ota
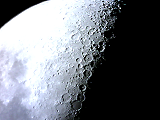
En mi caso la colimación era buena pero la definición no, por lo que decidí desmontar el ojo para ver si había algún problema en la alineación del tren óptico y descubrí que el cono interno que va pegado al punto aluminizado del menisco estaba descentrado con respecto a dicha mancha y supuse que esto se podía hacer si el secundario no estaba alineado con el tubo primario, por supuesto no despegué el cono para centrarlo sino que decidí voltear el ensamble frontal donde el dedo meñiquees , este montaje se enrosca en el tubo de la Ota y asi sucesivamente,girándolo cada centímetro (previamente marcando y antes de empezar a girar un punto tanto en el aro delantero como en el tubo de la ota para fijar una referencia) y observando cada nuevo pequeño giro (un centímetro recorrido en cada pequeño giro) una imagen que Anteriormente lo había tenido bien enfocado en la distancia y por supuesto, enfocándolo con cada mini giro, ubicaba donde en esos giros la imagen se veía más nítida al volver a enfocar.
Localicé el punto donde la imagen se veía más nítida y definida y lo marqué con una cinta de papel y una raya en la boca del tubo, guiándome para ello con la marca anterior que hice antes de empezar qué y que había estado arrastrando con cada vuelta.
Luego retire todo el conjunto frontal, retire el anillo negro que fija el menisco y marque en el borde del dedo meñique que coincidió con el primer punto de referencia antes de desenroscar un punto blanco con un corrector, luego gire el menisco a la nueva posición encontrada, luego el anillo negro y el tornillo en el conjunto frontal y se ve muy bien. y asi termina la historia
Cada par de tornillos funciona de forma independiente, ya sea colimado con una estrella real, con una tapa de colimación o con un cheshire.
Primero se identifica hacia que lado está el mayor desplazamiento de la sombra o anillos concéntricos y se afloja el tornillo pequeño de ese lado que
Cuando ajustamos el tornillo grande, la celda primaria se acerca a la parte trasera de la
En mi caso la colimación era buena pero la definición no, por lo que decidí desmontar el ojo para ver si había algún problema en la alineación del tren óptico y descubrí que el cono interno que va pegado al punto aluminizado del menisco estaba descentrado con respecto a dicha mancha y supuse que esto se podía hacer si el secundario no estaba alineado con el tubo primario, por supuesto no despegué el cono para centrarlo sino que decidí voltear el ensamble frontal donde el dedo meñique
Localicé el punto donde la imagen se veía más nítida y definida y lo marqué con una cinta de papel y una raya en la boca del tubo, guiándome para ello con la marca anterior que hice antes de empezar qué y que había estado arrastrando con cada vuelta.
Luego retire todo el conjunto frontal, retire el anillo negro que fija el menisco y marque en el borde del dedo meñique que coincidió con el primer punto de referencia antes de desenroscar un punto blanco con un corrector, luego gire el menisco a la nueva posición encontrada, luego el anillo negro y el tornillo en el conjunto frontal y se ve muy bien. y asi termina la historia
-
Gordon

- Site Admin

- Articles: 1051
- Posts: 8477
- Joined: Wed Apr 24, 2019 10:52 pm
- 5
- Location: Cottonwood, AZ
- Status:
Offline
-
TSS Awards Badges
TSS Photo of the Day
I Broke The Forum.
TSS EAA Messier awards
Re: Colimación maksutov Maxvision idéntico al Bresser 152/1900
Felicidades por haber colimado su telescopio. Esa es una tarea difícil, pero la mejora vale la pena una vez que la hayas hecho.
Gordon
Scopes: Explore Scientific ED80CF, Skywatcher 200 Quattro Imaging Newt, SeeStar S50 for EAA.
Mounts: Orion Atlas EQ-g mount & Skywatcher EQ5 Pro.
ZWO mini guider.
Image cameras: ZWO ASI1600 MM Cool, ZWO ASI533mc-Pro, ZWO ASI174mm-C (for use with my Quark chromosphere), ZWO ASI120MC
Filters: LRGB, Ha 7nm, O-III 7nm, S-II 7nm
Eyepieces: a few.
Primary software: Cartes du Ciel, N.I.N.A, StarTools V1.4.
-
Gordon
- Site Admin
- Articles: 1051
- Posts: 8477
- Joined: Wed Apr 24, 2019 10:52 pm
- 5
- Location: Cottonwood, AZ
- Status:
Offline
-
TSS Awards Badges
TSS Photo of the Day
I Broke The Forum.
TSS EAA Messier awards
Re: Colimación maksutov Maxvision idéntico al Bresser 152/1900
Translated:
"Hello again, in the end I solved the matter through practice and guided by your comments.
Each screw pair works independently, whether collimated with a real star, with a collimating cap, or with a cheshire.
First, identify which side is the greater displacement of the shadow or concentric rings and loosen the small screw on that side, which is only a lock and works by collimating with the large one, you can see where the shadow moves and according to this, continue with the other screws if necessary, having previously adjusted the locking screw that we loosened.
When we adjust the big screw, the primary cell gets closer to the back of theota and vice versa and thus we collimate this type of ota
In my case, the collimation was good but the definition was not, so I decided to disassemble the eye to see if there was any problem in the alignment of the optical train and I discovered that the internal cone that is attached to the aluminized point of the meniscus was decentered with respect to said stain and figured this could be done if the secondary was not in line with the primary tube, of course I didn't peel the cone off to center it but instead decided to flip the front assembly over where the little finger is, this assembly threads onto the tube of theOta and so on, turning it every centimeter (previously marking and before starting to turn a point both on the front ring and on the tube of the ota to set a reference) and observing each new small turn (one centimeter traveled in each small turn ) an image that had previously been well focused in the distance and of course, focusing it with each mini turn, located where in those turns the image looked sharper when refocusing.
I located the point where the image looked sharper and more defined and I marked it with a paper tape and a line at the mouth of the tube, guiding me with the previous mark that I made before starting what and that I had been dragging with each turn. .
Then remove the entire front assembly, remove the black ring that fixes the meniscus and mark on the edge of the little finger that it coincided with the first reference point before unscrewing a white dot with a corrector, then rotate the meniscus to the new found position , then the black ring and screw on the front assembly and it looks great. and so the story ends"
My reply:
Congratulations on collimating your telescope. That's a tall order, but the improvement is worth it once you've done it.
"Hello again, in the end I solved the matter through practice and guided by your comments.
Each screw pair works independently, whether collimated with a real star, with a collimating cap, or with a cheshire.
First, identify which side is the greater displacement of the shadow or concentric rings and loosen the small screw on that side, which is only a lock and works by collimating with the large one, you can see where the shadow moves and according to this, continue with the other screws if necessary, having previously adjusted the locking screw that we loosened.
When we adjust the big screw, the primary cell gets closer to the back of the
In my case, the collimation was good but the definition was not, so I decided to disassemble the eye to see if there was any problem in the alignment of the optical train and I discovered that the internal cone that is attached to the aluminized point of the meniscus was decentered with respect to said stain and figured this could be done if the secondary was not in line with the primary tube, of course I didn't peel the cone off to center it but instead decided to flip the front assembly over where the little finger is, this assembly threads onto the tube of the
I located the point where the image looked sharper and more defined and I marked it with a paper tape and a line at the mouth of the tube, guiding me with the previous mark that I made before starting what and that I had been dragging with each turn. .
Then remove the entire front assembly, remove the black ring that fixes the meniscus and mark on the edge of the little finger that it coincided with the first reference point before unscrewing a white dot with a corrector, then rotate the meniscus to the new found position , then the black ring and screw on the front assembly and it looks great. and so the story ends"
My reply:
Congratulations on collimating your telescope. That's a tall order, but the improvement is worth it once you've done it.
Gordon
Scopes: Explore Scientific ED80CF, Skywatcher 200 Quattro Imaging Newt, SeeStar S50 for EAA.
Mounts: Orion Atlas EQ-g mount & Skywatcher EQ5 Pro.
ZWO mini guider.
Image cameras: ZWO ASI1600 MM Cool, ZWO ASI533mc-Pro, ZWO ASI174mm-C (for use with my Quark chromosphere), ZWO ASI120MC
Filters: LRGB, Ha 7nm, O-III 7nm, S-II 7nm
Eyepieces: a few.
Primary software: Cartes du Ciel, N.I.N.A, StarTools V1.4.
-
lunaluser
- Articles: 0
- Posts: 8
- Joined: Sat Apr 08, 2023 12:02 am
- 1
- Location: Lujan de cuyo - mendoza - argentina
- Status:
Offline
Re: Colimación maksutov Maxvision idéntico al Bresser 152/1900
Gracias GordonGordon wrote: ↑Wed May 17, 2023 5:12 pm Translated:
"Hello again, in the end I solved the matter through practice and guided by your comments.
Each screw pair works independently, whether collimated with a real star, with a collimating cap, or with a cheshire.
First, identify which side is the greater displacement of the shadow or concentric rings and loosen the small screw on that side, which is only a lock and works by collimating with the large one, you can see where the shadow moves and according to this, continue with the other screws if necessary, having previously adjusted the locking screw that we loosened.
When we adjust the big screw, the primary cell gets closer to the back of the ota and vice versa and thus we collimate this type of ota
In my case, the collimation was good but the definition was not, so I decided to disassemble the eye to see if there was any problem in the alignment of the optical train and I discovered that the internal cone that is attached to the aluminized point of the meniscus was decentered with respect to said stain and figured this could be done if the secondary was not in line with the primary tube, of course I didn't peel the cone off to center it but instead decided to flip the front assembly over where the little finger is, this assembly threads onto the tube of the Ota and so on, turning it every centimeter (previously marking and before starting to turn a point both on the front ring and on the tube of the ota to set a reference) and observing each new small turn (one centimeter traveled in each small turn ) an image that had previously been well focused in the distance and of course, focusing it with each mini turn, located where in those turns the image looked sharper when refocusing.
I located the point where the image looked sharper and more defined and I marked it with a paper tape and a line at the mouth of the tube, guiding me with the previous mark that I made before starting what and that I had been dragging with each turn. .
Then remove the entire front assembly, remove the black ring that fixes the meniscus and mark on the edge of the little finger that it coincided with the first reference point before unscrewing a white dot with a corrector, then rotate the meniscus to the new found position , then the black ring and screw on the front assembly and it looks great. and so the story ends"
My reply:
Congratulations on collimating your telescope. That's a tall order, but the improvement is worth it once you've done it.
-
Richard

- Articles: 0
- Posts: 1169
- Joined: Mon May 13, 2019 6:55 am
- 5
- Location: South Africa/Czech Rep
- Status:
Offline
Re: Colimación maksutov Maxvision idéntico al Bresser 152/1900
They normally hold collimation well I am surprised that it was out , but they are heavy and could of been dropped as some time, but all good now well done
Reflectors GSO 200 Dobs
Refractors None
SCT C5 on a SLT mount
Mak 150 Bosma on a EQ5
Refractors None
SCT C5 on a SLT mount
Mak 150 Bosma on a EQ5
-
lunaluser
- Articles: 0
- Posts: 8
- Joined: Sat Apr 08, 2023 12:02 am
- 1
- Location: Lujan de cuyo - mendoza - argentina
- Status:
Offline
Re: Colimación maksutov Maxvision idéntico al Bresser 152/1900
Hola Ricardo, buenas noches, cuando lo desenbale en su momento me di cuenta que la caja venia maltratada, me imagino que el viaje desde China a Argentina fue movido. Gracias por tu comentario. Saludos
Create an account or sign in to join the discussion
You need to be a member in order to post a reply
Create an account
Not a member? register to join our community
Members can start their own topics & subscribe to topics
It’s free and only takes a minute