
Thanks
First Light 80mm f/8 Refractor on Nano Twilight Mount
-
MistrBadgr

- Articles: 0
- Posts: 748
- Joined: Sat May 11, 2019 9:27 pm
- 5
- Location: Broken Arrow, Okla, USA
- Status:
Offline
-
TSS Awards Badges
First Light 80mm f/8 Refractor on Nano Twilight Mount
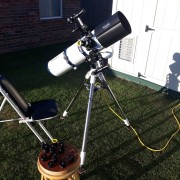
I received this scope yesterday and it is still in its box. I bought it to fit into a line-up of five f/ 8 scopes for a little investigation I hope to do. The line-up includes 60, 80, and 100mm (clear aperture ) achromatic refractors and 112 and 125mm (active mirror diameter) Newtonian reflectors. I also hope to do a review of this new scope. Naturally, I can come up with a list of attributes to mention in the review, but thought I would ask here for any questions about the scope that any of you might have, in case I do not think of it myself. Any ideas on what the review should include?
Thanks
Thanks
Bill Steen
Many small scopes, plus a Lightbridge 12, LX 70-8R,6R,6M
Many eyepieces, just not really expensive ones.
Many small scopes, plus a Lightbridge 12, LX 70-8R,6R,6M
Many eyepieces, just not really expensive ones.
-
JayTee

- Articles: 2
- Posts: 5651
- Joined: Thu Apr 25, 2019 3:23 am
- 5
- Location: Idaho, USA
- Status:
Offline
-
TSS Awards Badges
TSS Photo of the Day
Re: First Light 80mm f/8 Refractor on Nano Twilight Mount
Congrats Bill and thanks for doing this.
Here is a short list right off the top of my head:
The resolution using double stars
The shape of objects at the edge of thefov
The level of contrast noted in thefov
Here is a short list right off the top of my head:
The resolution using double stars
The shape of objects at the edge of the
The level of contrast noted in the
∞ Primary Scopes: #1: Celestron CPC1100 #2: 8" f/7.5 Dob #3: CR150HD f/8 6" frac
∞ AP Scopes: #1: TPO 6" f/9 RC #2: ES 102 f/7 APO #3: ES 80mm f/6 APO
∞ G&G Scopes: #1: Meade 102mm f/7.8 #2: Bresser 102mm f/4.5
∞ Guide Scopes: 70 & 80mm fracs -- The El Cheapo Bros.
∞ Mounts: iOptron CEM70AG, SW EQ6R, Celestron AVX, SLT & GT (Alt-Az), Meade DS2000
∞ Cameras: #1: ZWO ASI294MC Pro #2: 662MC #3: 120MC, Canon T3i, Orion SSAG, WYZE Cam3
∞ Binos: 10X50,11X70,15X70, 25X100 ∞ AP Gear: ZWO EAF and mini EFW and the Optolong L-eXteme filter
∞ EPs: ES 2": 21mm 100° & 30mm 82° Pentax XW: 7, 10, 14, & 20mm 70°
Searching the skies since 1966. "I never met a scope I didn't want to keep."
-
WilliamPaolini

- Articles: 9
- Posts: 303
- Joined: Tue May 25, 2021 8:57 pm
- 2
- Location: Virginia, USA
- Status:
Offline
-
TSS Awards Badges
Re: First Light 80mm f/8 Refractor on Nano Twilight Mount
Hi. Here's some things I would comment on in a review...
1. Checking that the scope is well collimated. If not, then collimate because testing a scope out of collimation is of no benefit to anyone.
2. Operation of mechanicals (i.e., focuser) is important to test how it works for heavy vs light eyepieces for smoothness and slippage.
3. ForCA tests do not get extreme on stars. Most people do not "observe" Sirius other than looking for the Pup. So for bright stars use reasonable ones like Mag 0 and Mag 1. Also choose some bright stars of different colors to note how the perception of CA might change, so say a Blue-White vs. Yellow vs. Orange-Red.
4. Also forCA tests nice to have a reference scope without CA so you can visually describe bettter the CA you are seeing. So in your case make masks for one of your Newtonians to match the aperture of the Achromat testing, and make sure to use the make "magnification" on each so they are leveled (i.e., will need different FL eyepieces for the Achro vs. the Newt most likely since focal lengths probably different).
5. The Moon is NOT a good target to assess sharpness since it is so high in contrast and so bright that it mostly always looks sharp. But it is a good test forCA using the limb of the Moon in the center of the FOV of the eyepiece.
6. Planets are good for sharpness/contrast test, but mainly just Jupiter and Mars as these have the low contrast features that will show differences best in how contrasty of a view the scope will put up. If comparing the various scopes for this test might be best to mask them all to the sameaperture and set at same magnification this way you level the scope's performance. Otherwise, if you keep their original apertures and compare planetary views, it will be hard given that the image brightness will be different if you use the same magnification in all of them or if you level the brightness using same exit pupil for all then the magnification will be different. Perceptually difficult to assess with these gross differences at play.
7. I would also do a test of each scope at 50x/inch, then maybe at 75x/inchaperture to see how well the scope performs when pushed. So if collimation is off or the figure of the optics is less than desirable then views will get softer at lower magnification per inch aperture setting compared to a scope with better attributes. Realize though that atmospheric seeing may come into play with the larger aperture . You can mitigate this though if you do this test in the daytime observing something no further than say 25 yards down field so contrast of object is preserves since going through little atmosphere. I tend to use a flower for this test especially if the pollen on the internal structures is visible for fine details. IMO if a scope performs well with a sharp and contrasty view (equivalent to close up with naked eye) at 50x/inch then the scope is IMO a great scope for astronomy and hard to ask for more in performance unless a premium-level optic.
8. Finally, always good to assess how the scope performs on well knownDSO . So choose the more showcase objects as most everyone has good mental pictures of those and they will be able to identify more with what you see.
Good luck and above all have fun with your test!!
1. Checking that the scope is well collimated. If not, then collimate because testing a scope out of collimation is of no benefit to anyone.
2. Operation of mechanicals (i.e., focuser) is important to test how it works for heavy vs light eyepieces for smoothness and slippage.
3. For
4. Also for
5. The Moon is NOT a good target to assess sharpness since it is so high in contrast and so bright that it mostly always looks sharp. But it is a good test for
6. Planets are good for sharpness/contrast test, but mainly just Jupiter and Mars as these have the low contrast features that will show differences best in how contrasty of a view the scope will put up. If comparing the various scopes for this test might be best to mask them all to the same
7. I would also do a test of each scope at 50x/inch, then maybe at 75x/inch
8. Finally, always good to assess how the scope performs on well known
Good luck and above all have fun with your test!!
Last edited by WilliamPaolini on Sat Dec 11, 2021 8:04 pm, edited 1 time in total.
-Bill
U.S.A.F. Veteran - Visual Amateur Astronomer since 1966 - Fully Retired since 2019
8" f/5 Newt - Lunt 152 f/7.9 - TSA 102 f/8 - Vixen 81S f/7.7 - P.S.T. - Pentax 65ED II - Nikon 12x50 AE
Pentax XWs - Baader Morpheus - Takahashi LEs - Edmund RKEs - BST Starguiders - 6ZAO-II/5XO/4Abbe
PM and Email communications always welcomed
-
MistrBadgr
- Articles: 0
- Posts: 748
- Joined: Sat May 11, 2019 9:27 pm
- 5
- Location: Broken Arrow, Okla, USA
- Status:
Offline
-
TSS Awards Badges
Re: First Light 80mm f/8 Refractor on Nano Twilight Mount
Thanks, JayTee and Bill! Excellent suggestions! Anyone else, come on in! 
Bill Steen
Many small scopes, plus a Lightbridge 12, LX 70-8R,6R,6M
Many eyepieces, just not really expensive ones.
Many small scopes, plus a Lightbridge 12, LX 70-8R,6R,6M
Many eyepieces, just not really expensive ones.
-
pakarinen

- Articles: 0
- Posts: 4038
- Joined: Fri Jun 14, 2019 3:33 pm
- 4
- Location: NE Illinois
- Status:
Offline
-
TSS Awards Badges
Re: First Light 80mm f/8 Refractor on Nano Twilight Mount
I'm curious about the performance of the Nano mount.
=============================================================================
Man... That's some icky-tasting stuff!
=============================================================================
AT50, AT72EDII, ST80, ST102; Scopetech Zero, AZ-GTi, AZ Pronto; Innorel RT90C, Oberwerk 5000; Orion Giantview 15x70s, Vortex 8x42s, Navy surplus 7x50s, Nikon 10x50s
Man... That's some icky-tasting stuff!
=============================================================================
AT50, AT72EDII, ST80, ST102; Scopetech Zero, AZ-GTi, AZ Pronto; Innorel RT90C, Oberwerk 5000; Orion Giantview 15x70s, Vortex 8x42s, Navy surplus 7x50s, Nikon 10x50s
-
MistrBadgr
- Articles: 0
- Posts: 748
- Joined: Sat May 11, 2019 9:27 pm
- 5
- Location: Broken Arrow, Okla, USA
- Status:
Offline
-
TSS Awards Badges
Re: First Light 80mm f/8 Refractor on Nano Twilight Mount
Hi Parakinen,
I tried to post an answer, but apparently I did not push the right button. I will post longer after I think things through more. I want to be very accurate in my description.
The short version is that it is a nice mount for lighter, beginner scopes. No stiction unless the screws are really tight. However, with the low stiction level, the scope will gradually creap up or down if the balance is not very close to exact. It has a wiggle issue, as most entry level mounts and tripods have. I will talk about what I will do to stop that.
I like the mount. It is one of the better beginner level units that I have found, both in operation and looks. But.......it is a beginner mount.
Bill Steen
Many small scopes, plus a Lightbridge 12, LX 70-8R,6R,6M
Many eyepieces, just not really expensive ones.
Many small scopes, plus a Lightbridge 12, LX 70-8R,6R,6M
Many eyepieces, just not really expensive ones.
-
MistrBadgr
- Articles: 0
- Posts: 748
- Joined: Sat May 11, 2019 9:27 pm
- 5
- Location: Broken Arrow, Okla, USA
- Status:
Offline
-
TSS Awards Badges
Re: First Light 80mm f/8 Refractor on Nano Twilight Mount
I thought I would put the bits of information I have learned so far about this scope/mount/tripod here for your entertainment and as a place I can go to when it comes time to put it all together. I will put it in fairly small chunks in a number of posts, rather than typing in a large amount, then hitting some unknown key and have the whole thing disappear.
Preliminaries:
When the box came, there was an outer shipping box that had a double layer of corrugated pasteboard, then an inner box with a single layer of corrugated pasteboard, then two different long boxes inside of that with the tripod and miscellaneous parts in one and the optical tube in the other. These were solid stiff cardboard with no corrugation. No fancy colored pictures or anything like that, just plain printing on the box material...all down to business...no unnecessary expense on fancy printing that just gets thrown away.
I took an inventory of all the parts and found one screw missing. It was the thumb screw that holds the red dot finder in place. It happened to be the same as the one that can hold the draw tube in place, so I simply used the draw tubes thumb screw for the red dot finder. After looking everywhere in the boxes and the plastic bags the various parts were in, and then did it all over again an hour or so later, just to make sure I did not miss the screw, I called Explore Scientific to see if they had any. It was not an item that they kept in inventory, but the person I talked to had no problem sending through a request. I even offered to pay for the screw, just to have one. The man told me he would take care of it. Due to this being before Christmas, and I assume the people atES were covered over with work, it did take a while for the request to go through and for the screw to make it to me, but I did receive it as promised a couple weeks later. It took about a week for the screw to ship and another week to make it to me, just after Christmas. I live about an hour and a half or so from the town ES is located in, therefore, the Post Office system was clogged up as I would expect. I suspect they had to pull another unit out of inventory, if they had not already done this for someone else, and sacrificed it as a parts inventory. I do not know how ES works inside, but my experience in the past with another brand is that there are no spare parts sent here from China.
I am pleased with the way the scope was packaged and with the way the one small parts issue was handled.
I will continue with the tripod in the next post.
Preliminaries:
When the box came, there was an outer shipping box that had a double layer of corrugated pasteboard, then an inner box with a single layer of corrugated pasteboard, then two different long boxes inside of that with the tripod and miscellaneous parts in one and the optical tube in the other. These were solid stiff cardboard with no corrugation. No fancy colored pictures or anything like that, just plain printing on the box material...all down to business...no unnecessary expense on fancy printing that just gets thrown away.
I took an inventory of all the parts and found one screw missing. It was the thumb screw that holds the red dot finder in place. It happened to be the same as the one that can hold the draw tube in place, so I simply used the draw tubes thumb screw for the red dot finder. After looking everywhere in the boxes and the plastic bags the various parts were in, and then did it all over again an hour or so later, just to make sure I did not miss the screw, I called Explore Scientific to see if they had any. It was not an item that they kept in inventory, but the person I talked to had no problem sending through a request. I even offered to pay for the screw, just to have one. The man told me he would take care of it. Due to this being before Christmas, and I assume the people at
I am pleased with the way the scope was packaged and with the way the one small parts issue was handled.
I will continue with the tripod in the next post.
Bill Steen
Many small scopes, plus a Lightbridge 12, LX 70-8R,6R,6M
Many eyepieces, just not really expensive ones.
Many small scopes, plus a Lightbridge 12, LX 70-8R,6R,6M
Many eyepieces, just not really expensive ones.
-
MistrBadgr
- Articles: 0
- Posts: 748
- Joined: Sat May 11, 2019 9:27 pm
- 5
- Location: Broken Arrow, Okla, USA
- Status:
Offline
-
TSS Awards Badges
Re: First Light 80mm f/8 Refractor on Nano Twilight Mount
The tripod that comes with this scope is very similar to the ones I have that came with a Meade Infinity 102 and a Meade Polaris 130...chrome-plated steel tubing for the legs and mostly plastic parts for the rest.
The clearance between the plastic parts on the ends of the tubing is much tighter than on the Meade tripods, which is both good and bad. I think having the OD of the tubing and the ID if the connecting pieces match up snugly makes a nicer looking tripod and my engineering sense of rightness. The down side, as I found out when I tried to fill in the gaps on the Meade tripods, is that energy can transfer from any disturbance easier and wiggles last longer.
I managed to get the wiggle time down with changes I have used before with success, but I ran across a characteristic that I had not observed before. The wiggle time gets worse as temperature goes down. On the coldest night I had the scope out, it was 18 deg F. At that point, there was more wiggle time than I like, but it is not worth chasing. At around 30 degrees, the wiggle time is acceptable with the changes I made.
When I started out, it was evening and the temperature was about 40 deg F. Since the back yard was wet from rain, I had the scope set up on our concrete back porch and could just see the Moon from under the roof. I expected to have extra wiggle with the scope set up on concrete, but it seemed to take an extra long time from the scope to settle down. I checked the time by tapping the side of the scope with nothing in the eyepiece tray and an Orion 35mm Ultrascopic in the diagonal. I then counted for a time with my natural counts lasting a second and a third. The tap I use for this is what I will do when I want the scope to wiggle in order to make a dim object show up in the eyepiece. It took a count of five for the scope to stop wiggling. I knew I would need to look into this, but would do so later.
The next afternoon, I set up the scope in the same spot from the night before, but in the same eyepiece (which I will use for all of this wiggle testing) and counted the wiggle time with the same strength of tap, three times. All three came in with a four count instead of the five on the night before. I did not think I was doing anything different. The only variable I could think of was temperature, which was close to 60 deg F that afternoon.
The next step was to put a large eyepiece tray I made for my first Polaris scope, which has a 3/4 inch plywood piece cut to fit the inside of the eyepiece tray, and an eleven inch circular disk made from two thicknesses of the 3/4 inch plywood glued together, with twelve 1 1/4 inch holes drilled in it and a pin in the middle to hold the disk on the smaller piece and allow the eyepieces to be rotated. I had the tray full of a set of ten Astroplan eyepieces (Orion Ultrascopics and Celestron Ultimas) and a shorty barlow. Using that, the count was roughly three.
I then took the eyepiece tray off the scope and put some home-made vibration pads that use three layers of computer mouse pad material (2 inch squares), glued onto three inch squares of the 3/4 inch plywood. With vibration pads only, the count was a consistent 2 1/2. I then put the eyepiece tray back on the scope and the count dropped to 2. As a last step, I moved the whole rig onto the lawn and checked the time again. It was a consistent 1 1/2.
I left the scope set up on the grass and came back out that night when the temperature had dropped back to about 40 degrees. I checked the wiggle again. It had increased back to a 2 count consistently over three taps. The next time I took the scope out, the temperature was down just below freezing, or around 30 degrees. I checked the wiggle time again and it was a around a two a half count.
The next step was to put some zinc plated BBs in the lower legs. I drilled off the top of the pop rivets that hold the feet on the lower legs and punched in the rivets with a 10 pd box nail, which was a perfect fit for the hole. I had a full container of 6000 Daisy zinc coated BBs. I first pushed a wooden plug cut from a piece of 3/4 inch dowel rod down each lower leg tube to keep BBs from getting into the upper tube, then poured in BBs as equally as I could in each leg. The space inside the leg is approximately 25 inches. After the BBs were installed, there is maybe 4 or 5 inches of empty space left. It would probably take another 2000 BBs to fill the legs completely. For now, what I put in will be enough. I reinstalled the plastic feet on the legs. I found that a 4M by 12mm screw can be used to cut threads into hole through the side of the plastic foot and on through the steel tube material.
The next time I was out, I set up the scope with the eyepiece tray, eyepieces, vibration pads, etc. The only problem was that the temperature had dropped to 18 deg F. All the plastic, including my vibration pads I think, had stiffened up. Wiggle time with all these things was back up to around a 5 count with the same tap on the side of the scope. I will need to check things out again at a higher temperature. I expect the wiggle time to be at an acceptable level with the temperature back up to the freeze point or higher. Under more normal circumstances, I expect the wiggle time to be acceptable without the heavy eyepiece tray in place. However, I will check to make sure. If this works, the combination of the BBs in the legs and some home-made anti-vibration pads can be a relatively cheap way someone can get a steady tripod. The package of BBs normally costs in the $10-$12 range at places like Walmart.
I will post more later.
Bill Steen
Many small scopes, plus a Lightbridge 12, LX 70-8R,6R,6M
Many eyepieces, just not really expensive ones.
Many small scopes, plus a Lightbridge 12, LX 70-8R,6R,6M
Many eyepieces, just not really expensive ones.
-
MistrBadgr
- Articles: 0
- Posts: 748
- Joined: Sat May 11, 2019 9:27 pm
- 5
- Location: Broken Arrow, Okla, USA
- Status:
Offline
-
TSS Awards Badges
Re: First Light 80mm f/8 Refractor on Nano Twilight Mount
A follow-up on wiggle: I did some testing this afternoon. The temperature was 48 Deg F. BBs in lower legs.
The tripod on the back porch concrete with no anti-vibration pads and a bare original eyepiece tray, 4 counts. The same as before BBs.
Same place but with heavy eyepiece tray and same eyepieces but no anti-vibration pads, 3 counts. About the same as before.
Remove eyepiece tray and put on anti-vibration pads, 3 counts. A half count more than without BBs.
Tripod with heavy eyepiece tray and eyepieces, plus the anti-vibration pads, 2 count. About the same as before.
Took the whole rig out to the spot on the grass as last night, 1 count. The movement of the scope with a tap was one complete revolution with a stall spot a little past half way, then the scope returned to the rest spot and stopped. Seems like there are at least two phases to the movement that are countering each other to some extent, allowing the anti-vibration pads to work better. The changes to the time with the move to grass suggests to me that more layers of mouse pad may help, at least when the scope is on concrete.
I may look for a different material later that will work better at low temperatures. For now, the combination of items seems to work very well to stabilize the tripod under normal temperatures.
Bill Steen
Many small scopes, plus a Lightbridge 12, LX 70-8R,6R,6M
Many eyepieces, just not really expensive ones.
Many small scopes, plus a Lightbridge 12, LX 70-8R,6R,6M
Many eyepieces, just not really expensive ones.
-
MistrBadgr
- Articles: 0
- Posts: 748
- Joined: Sat May 11, 2019 9:27 pm
- 5
- Location: Broken Arrow, Okla, USA
- Status:
Offline
-
TSS Awards Badges
Re: First Light 80mm f/8 Refractor on Nano Twilight Mount
The nano mount, itself, is an interesting device. It is well made and looks good, but does have some eccentricities. I am sure there are some metal pieces inside for stiffness, but the exterior is covered with a very tough, white plastic material, that appears to be fairly thick. Though I get the sense that the white plastic can flex, the amount is very small and does not adversely affect my use of the mount. The cradle the scope sits in is also made of that same white plastic.
The azimuth and altitude bearings are made of a brown plastic that reminds me of one we used in the power industry to line coal hoppers. The material used in the hoppers was very slick and tough, allowing coal to flow smoothly with much less pluggage and wear compared to the underneath steel of the hopper. Both, the white and brown plastic seemed to have one trait in common, the static friction factor is very close to the dynamic friction factor. With the brown bearing material, this friction factor trait keeps the scope from having any noticeable "stickshun" when moving the telescope around, unless the bolts holding the mount together are so tight that it is a struggle to move the telescope around anyway.
The azimuth bearing tightness is adjusted with the mounting knob between the tripod legs, on the bottom side of the mounting plate. The altitude bearing tightness can be adjusted with very tiny changes to the nut on the end of altitude shaft. The altitude bearing is very sensitive to changes in the nut tightness. This nut is located inside the dovetail and is normally hidden by the cradle ring and telescope tube. The stiffness of the mount is greater with colder temperatures and becomes easier when the temperature goes up. I expect the need to make seasonal adjustments to the azimuth knob tension and the altitude nut to compensate for the temperature differences.
I had one experience of slippage with the white plastic of the cradle ring. I had been storing the scope with the scope positioned horizontally, but was having a little trouble with positioning the scope in my outbuilding with other scopes. I normally store entry level scopes when on a tripod with the tube pointed vertical, and decided to do that with this new scope. After a couple of days, I pulled the scope out and found that the optical tube and slowly slipped downward about a half inch and was now out of balance. I had the cradle ring knob tightened about as tight as I thought it should be, but that was not enough. I will try tightening the knob a little more, but I am concerned about flexing the tube and affecting collimation. I may try other things to stop the slippage, like placing pieces of tape in out of the way places.
I did a little work to find out how heavy an eyepiece the mount will handle with this scope. After pushing the scope back and forth in the craddle ring to find the exact spot where the objective would not quite move downward with the eyepiece removed (objective cover removed and diagonal in place), I then tried different eyepieces and barlow and eyepiece combinations. I then weighed the heaviest that would work and the lightest that did not work on a postal scale. At 73 deg F, and the way I had the mount set up, the rig could handle up to about 8 1/2 oz in the diagonal. At 9 oz, the scope would droop down.
The little handle that comes in the mount may be useful with a small Cassegrain type scope installed on the mount, but serves no purpose with the scope I have. It tends to move around in the threads some and is just something that distracts my attention sometimes when I move the scope around. The next time I have the scope off the mount, this handle will be removed.
Bill Steen
Many small scopes, plus a Lightbridge 12, LX 70-8R,6R,6M
Many eyepieces, just not really expensive ones.
Many small scopes, plus a Lightbridge 12, LX 70-8R,6R,6M
Many eyepieces, just not really expensive ones.
-
MistrBadgr
- Articles: 0
- Posts: 748
- Joined: Sat May 11, 2019 9:27 pm
- 5
- Location: Broken Arrow, Okla, USA
- Status:
Offline
-
TSS Awards Badges
Re: First Light 80mm f/8 Refractor on Nano Twilight Mount
The Optical Tube and Its Accessories:
The optical tube is very well made for an entry level scope. The overall setup is a good light pollution fighter, right out of the box, and mine came with a good collimation.
The dew shield is well made from aluminum, I suspect, and has an unusual strip of black plastic around the outward end that the lens cover fits into. This black ring seems to work somewhat like a baffle, I think, and knocks out some of the oblique light pollution that would otherwise bounce around inside the dew shield, with some ending up hurting image contrast. The dew shield can be moved outward maybe two inches, if so desired, for a small improvement in light pollution reduction. There is a small piece of material, probably felt, attached to the lens cell that holds the dew shield in position. If I remove that piece, I believe I can line the dew shield with flocking to get a marginal improvement in light reflection reduction.
The insides of the main tube and draw tube have a high quality flat black coating and each tube has a single, well-placed baffle. I have not taken any measurements and made any drawings to make sure the whole objective area is being used, at least in the center of the field, but casual inspection and personal experience with the scope, does not indicate anything is amiss.
I am impressed with the care taken to spray all relevant surfaces inside flat black. Even the inside end of the draw tube is flat black, rather than the normal shiny chrome finish.
The objective cell is glued to the main tube, rather than having the normal three screws sticking partially into the light cone of many entry-level scopes. The drawback to that is that I cannot remove the cell to get good access to the inside of the scope on that end for flocking the inside of the tube. However, with the good coating and baffle setup, and with other modifications, I do not think the lack of tube flocking with hurt performance to a noticeable degree. There is one nut and bolt installed, I believe, to hold the lens cell in place while the glue dries. Since this nut and bolt are close to the objective lens, where the light cone is the largest, I suspected there could be unwanted light reflection that could cause a minor amount of interference. Whether this is true or not, I will remove that nut and bolt when an opportunity presented itself, since it is no longer needed with the glue dried.
The focuser has a plastic body made with the same tough material that is used in the mount. It is set up as good as, and generally better than, any that I have seen in entry level scopes. It is a rack and pinion focuser as one would expect. The focus knobs are quite heavy, with what appears to be cast aluminum knobs and a substantial steel shaft. Inside, there are three runners for the draw tube to travel on. Two have a plastic material with grooves that run along the length of the draw tube when it is in place. These are positioned, I think, 60 degrees on either side of the rack, to support the tube rather than having the pinion and its spring push the draw tube upward. These two races have bases that are part of the cast plastic focuser body.
Opposite the draw tube rack is the third race, which is different. There is a separate strip of cast plastic with what appears to be a strip of flocking stuck to the side that contacts the draw tube. The opposite side of that plastic strip has two shallow cavities. A couple of set screws run through the body material on top of the focuser and into the shallow cavities in the strip to keep it from moving in or out of the focuser as the draw tube moves. A thumb screw runs through the body material between the two set screws to push on the plastic strip to apply pressure on the draw tube and keep it pushed into the two lower races. So far, this system has kept the scope and draw tube collimated.
The draw tube baffle, I believe, is cast as part of the draw tube, rather than in independent piece pushed inside. However, I did not try to remove it, not wanting to mess up the coating. Another curious feature of the draw tube is that it ends on the outside with threads, instead of a 1 ¼ inch slip fit. An additional black piece, about two inches long that does have a 1 ¼ inch slip fit, screws onto the draw tube.
Another adapter piece is also supplied that can be screwed onto the draw tube threads and has what I think are camera threads on the outside end. Off hand, I do not think the mount will hold the weight of a camera. Either the camera needs to be light weight, or the scope will need to be attached to a stronger mount. I suspect the Nano Twilight mount will not work with any but the lightest cameras due to weight considerations.
A cell phone holder that attaches to the eyepiece is supplied, for taking pictures through the scope. Again, weight of the cell phone may be an issue and require a counterbalance on the objective end of the scope.
The red dot finder is a style that I like with a reasonably large, somewhat rectangular screen. It is quite adequate for the task. The finder’s foot is a different shape than I am used to. I cannot describe it but will have a picture of it in my final document. It holds the finder in position a better than the square feet on most inexpensive finders.
The finder shoe is cast into the focuser body plastic. It uses a single set screw, which was missing on the scope I was sent. After searching through all the packing and plastic bags that various parts came in, and not finding the screw, I called Explore Scientific and offered to buy a screw. I was told that the thumb screw was not a stocked item, but they would get one for me since mine was missing, free of charge. A couple of days later, it shipped.
The 1-1/4-inch diagonal, though certainly not a high dollar version, works quite well and I see no reason to replace it with something more expensive, unless that might be an Amici type.
The single eyepiece that is provided, is an unbranded 25mm, Fully Multi-coated “Super Plossl.” It is a nice eyepiece that will not need to be replaced, rather than the normal two eyepieces and a Barlow that normally end up being put aside. (Note: The label on the eyepiece spells Plossl with the two dots over the "o". But, I cannot remember how to do that on my computer right now.
Now, on to testing and such things!
Bill Steen
Many small scopes, plus a Lightbridge 12, LX 70-8R,6R,6M
Many eyepieces, just not really expensive ones.
Many small scopes, plus a Lightbridge 12, LX 70-8R,6R,6M
Many eyepieces, just not really expensive ones.
-
Lady Fraktor


- Articles: 0
- Posts: 10035
- Joined: Mon Apr 29, 2019 9:14 pm
- 5
- Location: Slovakia
- Status:
Offline
Re: First Light 80mm f/8 Refractor on Nano Twilight Mount
A good review Bill.
Try Alt-148 to get ö or Alt-153 Ö
Try Alt-148 to get ö or Alt-153 Ö
Gabrielle
See Far Sticks: Elita 103/1575, AOM FLT 105/1000, Bresser 127/1200 BV, Nočný stopár 152/1200, Vyrobené doma 70/700, Stellarvue NHNG DX 80/552, TAL RS 100/1000, Vixen SD115s/885
EQ: TAL MT-1, Vixen SXP, SXP2, AXJ, AXD
Az/Alt: AYO Digi II, Stellarvue M2C, Argo Navis encoders on both
Tripods: Berlebach Planet (2), Uni 28 Astro, Report 372, TAL factory maple, Vixen ASG-CB90, Vixen AXD-TR102
Diagonals: Astro-Physics, Baader Amici, Baader Herschel, iStar Blue, Stellarvue DX, Tak prism, TAL, Vixen
Eyepieces: Antares to Zeiss (1000101)
The only culture I have is from yogurt
-
Gordon Online
- Site Admin

- Articles: 1051
- Posts: 8452
- Joined: Wed Apr 24, 2019 10:52 pm
- 5
- Location: Cottonwood, AZ
- Status:
Online
-
TSS Awards Badges
TSS Photo of the Day
I Broke The Forum.
TSS EAA Messier awards
Re: First Light 80mm f/8 Refractor on Nano Twilight Mount
Hey Bill,
Once you have completed what you feel is a finished review why don't you submit it for a formal review?
viewtopic.php?f=94&t=1771
Once you have completed what you feel is a finished review why don't you submit it for a formal review?
viewtopic.php?f=94&t=1771
Gordon
Scopes: Explore Scientific ED80CF, Skywatcher 200 Quattro Imaging Newt, SeeStar S50 for EAA.
Mounts: Orion Atlas EQ-g mount & Skywatcher EQ5 Pro.
ZWO mini guider.
Image cameras: ZWO ASI1600 MM Cool, ZWO ASI533mc-Pro, ZWO ASI174mm-C (for use with my Quark chromosphere), ZWO ASI120MC
Filters: LRGB, Ha 7nm, O-III 7nm, S-II 7nm
Eyepieces: a few.
Primary software: Cartes du Ciel, N.I.N.A, StarTools V1.4.
-
Makuser

- In Memory

- Articles: 0
- Posts: 6394
- Joined: Mon May 06, 2019 12:53 am
- 5
- Location: Rockledge, FL.
- Status:
Offline
-
TSS Photo of the Day
TSS Awards Badges
Re: First Light 80mm f/8 Refractor on Nano Twilight Mount
Hi Bill. A very nice and thorough review from you. This was a good read for me and I agree with Gordon that you should consider making a "formal review" of your fine work. Thanks for sharing this report with us on here Bill and the best of wishes for many clear skies.
Marshall
Sky-Watcher 90mm f/13.8 Maksutov-Cassegrain on motorized Multimount
Orion Astroview 120ST f/5 Refractor on EQ3 mount
Celestron Comet Catcher 140mm f/3.64 Schmidt-Newtonian on alt-az mount
Celestron Omni XLT150R f/5 Refractor on CG4 mount with dual axis drives.
Orion 180mm f/15 Maksutov-Cassegrain on CG5-GT Goto mount.
Orion XT12i 12" f/4.9 Dobsonian Intelliscope.
Kamakura 7x35 Binoculars and Celestron SkyMaster 15x70 Binoculars. ZWO ASI 120MC camera.
>)))))*>
-
MistrBadgr
- Articles: 0
- Posts: 748
- Joined: Sat May 11, 2019 9:27 pm
- 5
- Location: Broken Arrow, Okla, USA
- Status:
Offline
-
TSS Awards Badges
Re: First Light 80mm f/8 Refractor on Nano Twilight Mount
Thanks everyone for the kind words and encouragement! I do plan on writing up the whole thing in one document and submitting it. I have a ways to go yet, taking in the advice I received from some of you on what to include, plus looking at the list of suggestions and/or requirements for a review. It will take some time. The sky has not been cooperating very well for the last few months.
Bill Steen
Many small scopes, plus a Lightbridge 12, LX 70-8R,6R,6M
Many eyepieces, just not really expensive ones.
Many small scopes, plus a Lightbridge 12, LX 70-8R,6R,6M
Many eyepieces, just not really expensive ones.
-
MistrBadgr
- Articles: 0
- Posts: 748
- Joined: Sat May 11, 2019 9:27 pm
- 5
- Location: Broken Arrow, Okla, USA
- Status:
Offline
-
TSS Awards Badges
Re: First Light 80mm f/8 Refractor on Nano Twilight Mount
I did a little testing tonight before the clouds rolled in and thought I would write it here before I got all mixed up.
Sirius was the one bright star that was available to me in one part of the sky that looked really clear. I have a membrane that runs around the back of my eyes, just in front of the retina, that gets in my way at high powers and Sirius gives me the best view right now. What I found was, to the best of my ability to tell, the in and out focus images looked identical as far as the light density, shape of the rings, and the way the outer bright ring looked, other than the color purple. When focused, there was a visible purple fringe around the star, though not very bright. Inside of focus, the inside of the disk, all except the outermost ring, was tinted purple. When outside of focus, there was purple fringe around the outside of of the outermost ring while inside the disk, the color seemed to be a neutral white as was the outer ring.
Comparing what I saw to the printed examples of an unobstructed objective,in Bruce Suiter's book, my disks looked like his computer generated images for zero wave front error. I spent some time studying mine with 15, 10, and 5mm eyepieces, with the 15mm giving me the best view with less eyeball interference. From what I could tell, the only difference between my images and the ones in Mr. Suiter's book were that the outer dark ring was a little darker than the ones in the book, and the outer bright ring might have been a touch brighter.
Then the clouds moved into the Sirius area and I had to move to the Moon, which also did not seem to have any clouds or haze yet.
Tonight, the sky around the moon was about the clearest I have seen in the last few months, but would not be that way for long. I took the opportunity to look for fringing, even though the Moon was not absolutely full. I am using a mixture of Celestron Ultima and Orion Ultrascopic eyepieces, from 35mm down to 5mm, all five element Astroplans. For the eyepieces I used, 35, 25, 15, 10, and 5mm, I had a little bit of yellow green all the way around the outside when outside of focus and a little purple when inside of focus. With the scope focused on the outer edge of the moon, there might be a very tiny touch of either yellow green or purple. It would switch back and forth as I watched it, making me wonder of I was imagining the whole thing. As I went up on magnification to the 5mm eyepiece (128X or 5/8mm pupil size) the fringe colors became less. By the time I reached the 5mm eyepiece, they were dim enough that I wondered if I was seeing color at all, the hint was very slight.
At the high magnification, I ran all the way around the circumference and did not see any difference except in the area where the Moon was not quite illuminated all the way. I saw no fringe colors there.....Then the clouds moved in and I put up my equipment.
I have been reading the book, Choosing and Using Refractor Telescopes, by Neil English, learning about the Chromatic Aberration index. Using the formula shown in the book, focal ratio divided by the diameter of the objective in inches, theCA index for this scope is 2.54. There is a diagonal row of example achromatic scopes in a table shown, courtesy of Chris Lord, with that number. Basically, take the diameter in millimeters and divide that by ten to get its f-ratio. Some examples include 60mm @ f/ 6, 100mm @ f/ 10, 150mm @ f/ 15. With this level of a CA index, this 80mm scope seems to be running in some good company. However, there will definitely be some CA present, though it is considered correctable. Just thinking about it, seems to me the index number would be more of a ball park indication of the amount of false color seen, considering slight differences in the glasses that might be used and the prescriptions the lenses are ground to.
I have also done some work with Eta Orionis, to get an idea of what this scope can do when splitting doubles. But the story is a bit complicated to put in with the rest of this. (Sloppy multiple star in sloppy weather) From that work, I currently believe this scope can reach the Dawes Limit with the right target and a good sky. It just has to work a bit harder and is a little more affected by sky conditions than a long focal length 80mm scope with the same quality objective.
I have done more technical study of reflectors than refractors . With refractors, I have mostly just used them and ignored the finer technical points of the optics. Therefore, I am not sure what all of that means, other than the objective seems to be doing well for an entry level scope. However, I may be getting fooled, one way or another. If anyone would like to venture an opinion on what I am seeing, I would welcome it.
Sirius was the one bright star that was available to me in one part of the sky that looked really clear. I have a membrane that runs around the back of my eyes, just in front of the retina, that gets in my way at high powers and Sirius gives me the best view right now. What I found was, to the best of my ability to tell, the in and out focus images looked identical as far as the light density, shape of the rings, and the way the outer bright ring looked, other than the color purple. When focused, there was a visible purple fringe around the star, though not very bright. Inside of focus, the inside of the disk, all except the outermost ring, was tinted purple. When outside of focus, there was purple fringe around the outside of of the outermost ring while inside the disk, the color seemed to be a neutral white as was the outer ring.
Comparing what I saw to the printed examples of an unobstructed objective,in Bruce Suiter's book, my disks looked like his computer generated images for zero wave front error. I spent some time studying mine with 15, 10, and 5mm eyepieces, with the 15mm giving me the best view with less eyeball interference. From what I could tell, the only difference between my images and the ones in Mr. Suiter's book were that the outer dark ring was a little darker than the ones in the book, and the outer bright ring might have been a touch brighter.
Then the clouds moved into the Sirius area and I had to move to the Moon, which also did not seem to have any clouds or haze yet.
Tonight, the sky around the moon was about the clearest I have seen in the last few months, but would not be that way for long. I took the opportunity to look for fringing, even though the Moon was not absolutely full. I am using a mixture of Celestron Ultima and Orion Ultrascopic eyepieces, from 35mm down to 5mm, all five element Astroplans. For the eyepieces I used, 35, 25, 15, 10, and 5mm, I had a little bit of yellow green all the way around the outside when outside of focus and a little purple when inside of focus. With the scope focused on the outer edge of the moon, there might be a very tiny touch of either yellow green or purple. It would switch back and forth as I watched it, making me wonder of I was imagining the whole thing. As I went up on magnification to the 5mm eyepiece (128X or 5/8mm pupil size) the fringe colors became less. By the time I reached the 5mm eyepiece, they were dim enough that I wondered if I was seeing color at all, the hint was very slight.
At the high magnification, I ran all the way around the circumference and did not see any difference except in the area where the Moon was not quite illuminated all the way. I saw no fringe colors there.....Then the clouds moved in and I put up my equipment.
I have been reading the book, Choosing and Using Refractor Telescopes, by Neil English, learning about the Chromatic Aberration index. Using the formula shown in the book, focal ratio divided by the diameter of the objective in inches, the
I have also done some work with Eta Orionis, to get an idea of what this scope can do when splitting doubles. But the story is a bit complicated to put in with the rest of this. (Sloppy multiple star in sloppy weather) From that work, I currently believe this scope can reach the Dawes Limit with the right target and a good sky. It just has to work a bit harder and is a little more affected by sky conditions than a long focal length 80mm scope with the same quality objective.
I have done more technical study of reflectors than refractors . With refractors, I have mostly just used them and ignored the finer technical points of the optics. Therefore, I am not sure what all of that means, other than the objective seems to be doing well for an entry level scope. However, I may be getting fooled, one way or another. If anyone would like to venture an opinion on what I am seeing, I would welcome it.
Bill Steen
Many small scopes, plus a Lightbridge 12, LX 70-8R,6R,6M
Many eyepieces, just not really expensive ones.
Many small scopes, plus a Lightbridge 12, LX 70-8R,6R,6M
Many eyepieces, just not really expensive ones.
-
notFritzArgelander

- In Memory
- Articles: 0
- Posts: 14925
- Joined: Fri May 10, 2019 4:13 pm
- 5
- Location: Idaho US
- Status:
Offline
-
TSS Awards Badges
Re: First Light 80mm f/8 Refractor on Nano Twilight Mount
Good progress! English's book is a good choice and it provides a test for CA that can be quantifiable.
Scopes: Refs: Orion ST80, SV 80EDA f7, TS 102ED f11 Newts: AWB 130mm, f5, Z12 f5; Cats: VMC110L, Intes MK66,VMC200L f9.75 EPs: KK Fujiyama Orthoscopics, 2x Vixen NPLs (40-6mm) and BCOs, Baader Mark IV zooms, TV Panoptics, Delos, Plossl 32-8mm. Mixed brand Masuyama/Astroplans Binoculars: Nikon Aculon 10x50, Celestron 15x70, Baader Maxbright. Mounts: Star Seeker IV, Vixen Porta II, Celestron CG5
-
MistrBadgr
- Articles: 0
- Posts: 748
- Joined: Sat May 11, 2019 9:27 pm
- 5
- Location: Broken Arrow, Okla, USA
- Status:
Offline
-
TSS Awards Badges
Re: First Light 80mm f/8 Refractor on Nano Twilight Mount
Well, the weather has not been cooperating with me well enough, with a thin layer of moisture condensation at some high level as the sun goes down. I can see the thin layer forming high up shortly after things start getting dark enough to observe. I might have 15 minutes to do some work with this scope, related to an evaluation, before what I see starts being affected. That is normally not time enough for me to even get my head screwed on tight. Therefore, I thought I would talk about what I am planning for some activities with this and some other scopes and see what some of you think.
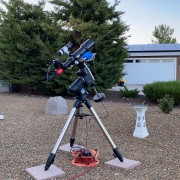
I have a Meade LX-70 equatorial mount with the two axis motor drive system and a polar scope. I also have the same setup on a Celestron OmniCG -4. I have been wanting to get a third rig like that in order to have three different scopes in operation at the same time, under the same sky conditions, just to learn what the advantages and disadvantages of each one is in a way that I can truly understand....sort of a personal mental exercise that I enjoy.
I found anotherCG -4 for sale on Astromart, which I purchased, in excellent condition. The freight from the Oregon coast to Northeastern Oklahoma ended up being pretty astounding, but I am still saving at least $100 over buy a new one. I have ordered one of the dual axis drive systems for that mount and another polar finder scope as well.
The two mount systems I already had track very well if I get them levelled properly and do a good polar alignment on them. I expect this new rig to do the same. Keeping three scopes going for scope comparsion purposes is all I can handle and get any of the work done other than
I also found a Celestron Power Seeker 80EQf/ 11.4 refractor OTA on eBay for about $70 that was still in its original wrappings and box.
This gives me the Meade Infinity 80f/ 5 that I set up for my light polluted skies and ran the Messier List with, the Explore Scientific 80mm f/ 8, and a Celestron Power Seeker 80EQ f/ 11.4, for one set of tests to determine myself the strengths and weaknesses of each of the available focal ratios available as new products for someone entering astronomy. This is a project for later, after I do this review of the Explore Scientific scope.
J. T. and Bill Paolini offered several suggestions of different questions to answer and things to do for this review, which I have been thinking about.
One of those in particular is a comparison between this refractor and aCA free scope. I have a Meade Polaris 114, which has a spherical mirror and a secondary mirror on a post mount that out performs all the other entry level reflectors that I own. The calculation for its possible PV wave front error is about 1/5th wave. Actual star test comparisons with prints in Bruce Suiter's book on Star Testing looks like the images for a 1/4 wave error. Most likely, I cannot tell the difference between a 1/5th and a 1/4th wave error anyway, so I think the scope is doing what it is supposed to. If I masked the mirror to 80mm, the calculated wave front error of about 1/20th of a wave, but the obstruction percentage increases to 32% and possibly give the wrong comparative impression with the 80mm refractor.
I have another little reflector that I would have to take out of its yoke mount and find some rings and mounting bar for that might be a better option, but I would like to hear some opinions about, if anyone would care to reply. This scope is a Meade Eclipseview 76 reflector. The active spherical mirror surface is 74mm diameter and has a focal length of 700mm. This scope is very sharp, in my opinion, and has a calculated PV wave front error of 1/13th wave. I have successfully used this scope to watch moon shadows crossing Jupiter, not quite as well as the Polaris 114, but pretty close. Contrast with it is nice and does not have any real deficiencies that I can tell. I believe it has a 3/4 inch (roughly) secondary mirror, which I really need to measure, which calculates to a 26% obstruction for the active mirror surface. Even though this scope's diameter is smaller than 80mm, I am wondering if this would not be a better match for the 80mm refractor than masking down the Polaris 114.
I also have an older Meade 90mm by 1000mm refractorOTA that was probably made in the early 2000s, and a Meade DS 2102 OTA (100mm by 800mm) that I have overhauled. The 2102 works slightly better than the Polaris 114 on the Moon. I also made a 3 inch mask for the 2102, which made the scope even sharper when viewing the Moon. I could make 80mm masks for either of these scopes, or use the Celestron 80EQ, after I get it checked out, as a scope with reduced CA for comparisons in this review. Remember, I will have three motorized mounts for a comparison in this review for CA comparisons.
Another possible thing I am thinking about is to do star tests on theES 80 with a set of CCD RGB filters that I have. I could at least make an attempt to do a star test with the different filters and make comparisons with the images in Mr. Suiter's book. I might be able to manage tests with one or two of the other optical tubes as well and compare them with the book images, but I would most likely need to do one filter per night on the three different scopes. I would most likely use the same eyepiece for the different combinations....probably a Celestron Ultima 5mm, that I have grown to really like, even though I have not had it very long. I also have a full set of HD Orthos that could be used for this testing.
If anyone has thoughts they are willing to share, I would appreciate their input.
Thanks!
I have a Meade LX-70 equatorial mount with the two axis motor drive system and a polar scope. I also have the same setup on a Celestron Omni
I found another
The two mount systems I already had track very well if I get them levelled properly and do a good polar alignment on them. I expect this new rig to do the same. Keeping three scopes going for scope comparsion purposes is all I can handle and get any of the work done other than
I also found a Celestron Power Seeker 80EQ
This gives me the Meade Infinity 80
J. T. and Bill Paolini offered several suggestions of different questions to answer and things to do for this review, which I have been thinking about.
One of those in particular is a comparison between this refractor and a
I have another little reflector that I would have to take out of its yoke mount and find some rings and mounting bar for that might be a better option, but I would like to hear some opinions about, if anyone would care to reply. This scope is a Meade Eclipseview 76 reflector. The active spherical mirror surface is 74mm diameter and has a focal length of 700mm. This scope is very sharp, in my opinion, and has a calculated PV wave front error of 1/13th wave. I have successfully used this scope to watch moon shadows crossing Jupiter, not quite as well as the Polaris 114, but pretty close. Contrast with it is nice and does not have any real deficiencies that I can tell. I believe it has a 3/4 inch (roughly) secondary mirror, which I really need to measure, which calculates to a 26% obstruction for the active mirror surface. Even though this scope's diameter is smaller than 80mm, I am wondering if this would not be a better match for the 80mm refractor than masking down the Polaris 114.
I also have an older Meade 90mm by 1000mm refractor
Another possible thing I am thinking about is to do star tests on the
If anyone has thoughts they are willing to share, I would appreciate their input.
Thanks!
Bill Steen
Many small scopes, plus a Lightbridge 12, LX 70-8R,6R,6M
Many eyepieces, just not really expensive ones.
Many small scopes, plus a Lightbridge 12, LX 70-8R,6R,6M
Many eyepieces, just not really expensive ones.
-
rickclark28
- Articles: 0
- Posts: 43
- Joined: Fri Nov 18, 2022 1:26 pm
- 1
- Location: Columbus Ohio USA
- Status:
Offline
Re: First Light 80mm f/8 Refractor on Nano Twilight Mount
Thanks for the data and time on this thread! I really appreciate the information. (Old but new to astronomy so I need help sorting out the data.)
I have this on my list for a new telescope for me and my granddaughter. It is between the 80mm and 102mm Explore Scientific FirstLight refractor. Not going to be used for photography, just backyard astronomy and maybe some trips to dark areas.
*I have the opportunity to get an Apertura 10 but have to wait on that purchase. (used from club member in March 2023)
*Any recommendations for a good telescope and mount of any type are appreciated. New to this forum so I will attempt to follow up on your findings.
Have a great day!
Rick Clark, CNA, CNE
Telescopes: *Celestron DX5 SCT 127mm 5" w/StarSense *Astro-Tech 80ED AT80ED
Eyepiece: AT-UWA 4/7/10/13/16, AT-PF 5.5/15.5/25, ES52/10, ES62/20, SvBony 26-70 2", 7-21/3-8 zoom, Bresser 30/35 2"
Binoculars: Minolta 10x50 Wide Angle 7", HUTACT 10x42,
Eyepiece: AT-UWA 4/7/10/13/16, AT-PF 5.5/15.5/25, ES52/10, ES62/20, SvBony 26-70 2", 7-21/3-8 zoom, Bresser 30/35 2"
Binoculars: Minolta 10x50 Wide Angle 7", HUTACT 10x42,
-
rickclark28
- Articles: 0
- Posts: 43
- Joined: Fri Nov 18, 2022 1:26 pm
- 1
- Location: Columbus Ohio USA
- Status:
Offline
Re: First Light 80mm f/8 Refractor on Nano Twilight Mount
*I may just order the 102mm Explore Scientific FirstLight refractor and take my chances. Looks to me like it will be a very good starter for me. I just want something that will NOT become a dust collector. I really appreciate this forum and it's members.
*MistrBagr has me excited about this FirstLight Refractor in 80mm or 102mm
*It is between the 80mm and 102mm Explore Scientific FirstLight refractor with the Nano Twilight Mount.
*MistrBagr has me excited about this FirstLight Refractor in 80mm or 102mm
*It is between the 80mm and 102mm Explore Scientific FirstLight refractor with the Nano Twilight Mount.
Telescopes: *Celestron DX5 SCT 127mm 5" w/StarSense *Astro-Tech 80ED AT80ED
Eyepiece: AT-UWA 4/7/10/13/16, AT-PF 5.5/15.5/25, ES52/10, ES62/20, SvBony 26-70 2", 7-21/3-8 zoom, Bresser 30/35 2"
Binoculars: Minolta 10x50 Wide Angle 7", HUTACT 10x42,
Eyepiece: AT-UWA 4/7/10/13/16, AT-PF 5.5/15.5/25, ES52/10, ES62/20, SvBony 26-70 2", 7-21/3-8 zoom, Bresser 30/35 2"
Binoculars: Minolta 10x50 Wide Angle 7", HUTACT 10x42,
Create an account or sign in to join the discussion
You need to be a member in order to post a reply
Create an account
Not a member? register to join our community
Members can start their own topics & subscribe to topics
It’s free and only takes a minute